Uncategorized
E. ELECTRICAL-WIRING
Although painting (Chapter 6) should precede installation of final wiring, it will be discussed here since procurement and preparation for it must be done prior to painting. However, a quick look at the end of Chapter 6 will help you coordinate the two activities. Your method of wiring should be planned in advance-wire guides placed, brackets for mounting of lights positioned and installed, holes for attachment of lights and ground wire holes drilled.
Wire used on trailers is not the same as that used in your home. Building construction wire is single strand and must carry 110 volts AC (alternating current). The wire used in your automobile and subsequently your trailer must be “stranded”, i.e. several tiny strands of wire are wound together building up to the size of wire designated. It is designed to carry 12 volts DC (direct current). The actual wire size is an important consideration. For tail, clearance and turn signal lights, a 16 or 18 gauge size is usually adequate. Electric brakes draw a lot of current and 14 gauge is a minimum choice for effective operation and safety. Wire too small may overheat, short out or start a fire, while wire too large is expensive and wasted copper.
Wires should be protected from the elements as much as possible and from the hard to avoid sharp corners found on most trailers. Notched or brittle wires short circuit easily. One option is to run conduit the full length of your trailer. In my experience, the expense and difficulty of installation make conduit a less than desirable choice. If the tongue and frame are tubing, a handy built-in form of conduit already exists. Any intermediate connector holes should be torched, not drilled, to reduce sharp edges. Although rubber grommets can be used in drilled holes, finding the right diameter and thickness is often difficult.

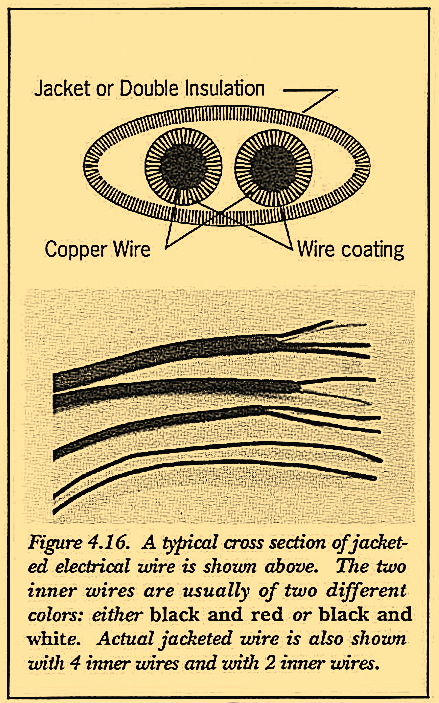
Once found, though, retaining the grommet in place can be accom- plished with weatherstrip adhesive. Another choice is the use of wires shrouded in a secondary plastic jacket an inexpensive protection without the hassle of conduit. A single layer of coating embrittles, splits and renders the wires suscep- tible to shorts more rapidly than secondarily coated wires. A cross section of such a jacketed wire is shown in Figure 4.16. Single wires without this secondary jacket should be avoided on a trailer wherever possible.
Routing wires and connect- ing lights to the plug at the coupler can be done a number of ways, as shown in Figures 4.17 through 4.19. Wires can be placed down one side of the trailer with smaller wires stretched across the back of the frame to the other side, as in Figure 4.17. This method works well for narrower trailers without clearance lights. Wires can also be drawn down both sides with extensor single strand wires pulled a short distance to clearance lights, if used, as in Figure 4.18. In California, these two methods. could be used with trailers under 80-inch width. Figure 4.19 is the method used when electric brakes and clearance lights are added-ostensibly for trailers over 80-inches wide.
Color coding of wires is another consideration which simplifies tracing of wire functions, especially important when shorts or problems occur. This simple procedure assigns a different color of wire for each light. function. The chosen color then runs from the connector to the light itself. Colors commonly used on trailers are shown in Figure 4.20. A sampling of automobile color codes, shown here also, indicates that colors vary considerably from one vehicle manufacturer to the next. The automobile’s wide array of systems – windows, air conditioning, radio, warning lights which a trailer does not have dictates complex color codes which seem to call for the choice of black and/or white ground wires. Other consider- ations take precedence for a trailer.
Through the years, trade customs have evoked the use of certain color codings which, as it turns out, actually conflict with market avail- ability of products to produce the best result, especially for small trailer manufacturers and individuals.


Jacketed wires, discussed earlier, are available as high volume manufactured items in “black/white” or “black/red” at affordable prices. A color coding to accommodate availability of this product, would make it easier to use this superior approach. As it is now, many manufacturers use a standardized code at the main pigtail to the tow vehicle, but use unjacketed black or whatever color they can get the rest of the way back. Without test equipment, it then becomes extremely difficult for end users to decipher which wire is which. The purpose of the color code is then defeated and shorts are next to impossible to trace.
On the other hand, the decision to adhere to a color code common to truck trailers often eliminates the superior solution-jacketed wires, since proper colors are not easily available. Is there a solution to this dilemma? Wire manufacturers could provide jacketed wires in colors easily used with common practice such as brown/yellow and brown/green. Unfortunately, the trailer market is quite small and far too price sensitive for such an item to be sold at acceptable prices.
Another solution? Provide a more compatible color code, as suggested in Figure 4.20. The “Compatible Code” of recommended colors, in my opinion, combines the best of all possibilities. The colors are easy to remember white is right, green is ground, black is basic for clearance, etc. Color coded jacketed wire is readily available without a special order. And being able to decipher which wire is which along with the protection afforded by jacketed wire keeps problems to a minimum. Currently, few trailers are fully color coded so changing to this easier code is not as difficult as it may first appear. Remember, there are no laws requiring that a specific color code be used anywhere (only suggestions), so the choice is entirely up to you.
