Trailers - Design & Build
D. ELECTRICAL-LIGHTING
There are three hardware parts to any trailer’s electrical system- lights, wire, connectors. Lights are the most obvious and are most often thought of first. Lights themselves can be quite confusing because of all the available mounting methods and the huge variety of styles. In addition, prices don’t seem to be particularly consistent with quality. Sorting out these variables can become quite a project. After we discuss lights, we will talk a little about the options for mounting them.

Electrical–Lights
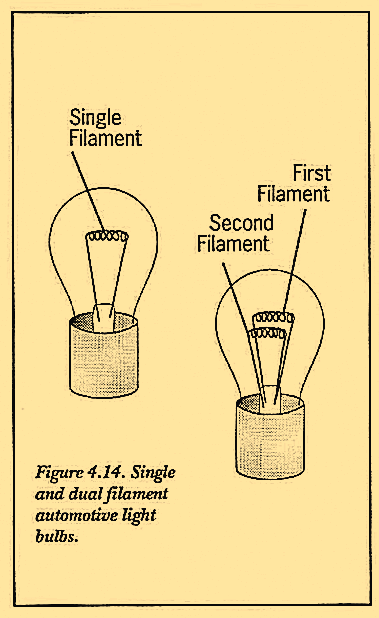
Lights, themselves consist of a housing, a bulb and a wire pigtail for connecting to the main trailer wiring harness. Some lights have 2 wires which means the bulb used with the light has 2 filaments, as shown in Figure 4.14. Each filament itself requires only one wire because the other half of the circuit is the ground, which moves through the housing onto the trailer frame. Plastic lights have to have special attachments incorporated into the light to provide for a ground. The bulb in most tail lights has 2 filaments. Just like most American cars, the brake light filament is the same as the turn signal filament, while the clearance light filament is on a completely separate circuit.

Most foreign cars these days have separate turn signal and brake light circuits. The two systems cannot be directly connected without an adapter. Lamps have several functions on a trailer. They are used for:
- tail lights,
- clearance & marker lights,
- turn signals-both right and left,
- license plate illumination,
- braking lights.
If you have a travel, horse or covered trailer, lighting for the interior will be a consideration and back-up lights are also a nice feature. Figure 4.15 shows several styles of lamps currently available and commonly used on trailers. Once you begin to research lights, you may feel a bit overwhelmed by the number of choices. Lights can be purchased for just about every conceivable purpose. There are numerous manufacturers with a wide range of quality and pricing.
Electrical–Mounting & the Law
In addition to hardware, there are two areas involving the trailer’s electrical system which might be considered “software”-mounting and the laws. Since many laws dictate where to place lights, these subjects go hand in hand. To respect and comply with the various laws of your state, attention to mounting of lights is crucial. While some consumers refuse to pay more for something that does not directly increase the fun-lights, in this case; most of us want our trailers to be seen at night and can appreciate that being without lights may well decrease the “fun” instead! It is certainly and if your easy to appreciate good lights on the vehicle in front of you; trailer lights do the job, the person behind you will be appreciative, too. In general, most vehicle lighting laws require:
- delineation of length, width and excessive height with clearance lights and tail lights;
- delineation of same with reflectors to enhance the lighting and provide a bright spot in the event of a burned out light;
- separate turn signal lamps on the appropriate side;
- rear lights to indicate braking; and
- a license plate illuminator.
In California, all lights must be clearly visible from 300-feet. Your state’s laws may vary from this and should be checked. In many states every light from a manufacturer must pass rigid tests regarding its illumination and construction, before even being offered for sale. Assuming it passes, a certificate to sell that light must be purchased and kept on file in a state office. Quite a rigamarole for just a light. But lights are important and for consumer assurance these regulations are also important.
Mounting locations should be chosen for maximum visibility, protection, economy and durability. The precise placement on your framework is up to you. There is no law that states how many screws or nuts or hooks or welds must be used to attach the light. If anything at all, the law may state “secure attachment,” leaving the details to you. Each light will have its own special mounting arrangement and requirement. Before you purchase any lights, consider seriously the method you plan to use to mount them. The mounting of lights has several constraints, many of which can become conflicting:
- lights must be easily visible and delineate the size of the vehicle-both length and width;
- lights must be positioned to resist being knocked off easily;
- the brackets must be designed to resist vibration failure;
- mounting with available tools must be possible;
- local Motor Vehicle Departments and police must approve.
Item 1) and 5) are quite commonly in conflict with items 2), 3), 4). For example, mounting of lights for visibility, 1), is easy if the lights protrude crudely from the trailer sides. This approach generally conflicts with items 2) and 3) where knockoff is easy and vibration resistance poor. For a travel or covered trailer, lights can easily be mounted on the extreme corners. For a utility, horse or boat trailer where the bed drops down between the wheels and tires, mounting of lights can become a real challenge.
Other important considerations include the bouncing from road bumps, which can be severe and should not be underestimated. Bear in mind that lights are quite light in weight and thus do not need a heavy weight bracket to support them. This, however, can be deceiving. A heavier bracket improperly connected frequently accentuates vibration problems and hastens a new crack, a new break. But a bracket too light, especially with a heavier weight at the end can also break easily. In my experience, mounting of lights can be a real challenge. Thinking about the mounting method and designing this in advance makes the final assembly process much easier.
