Trailers - Design & Build
C. ELECTRICAL SYSTEM
Equally, if not more important, is the delineation of your trailer with lights. Driving at night, abiding by the law or indicating braking to the fellow behind you-all require lights on your trailer . . . just like on your automobile. Lights are mounted on the frame: wires are connected to them and to a pigtail or plug at the very front of the trailer. The power to operate this system is drawn from your tow-car’s 12-volt battery. In many ways, it is all quite simple-a mere extension of the principle system used in your automobile. In other ways the electrical system can be quite complex with all its minute parts and pieces. . . and especially baffling, if it doesn’t work.
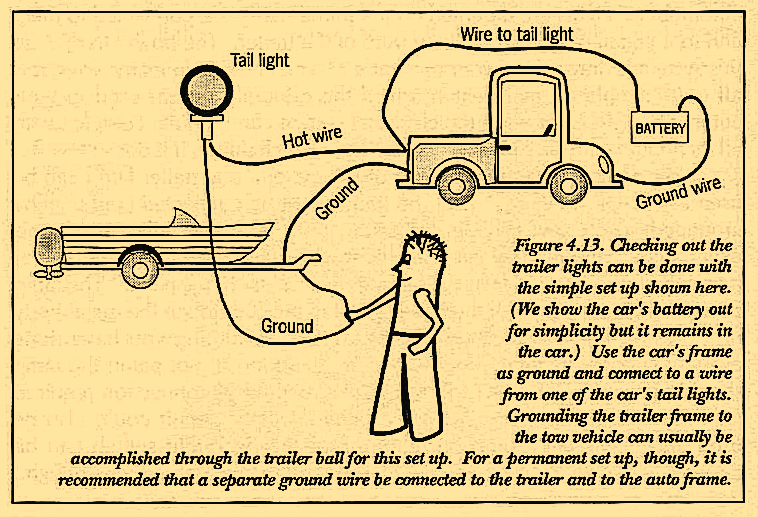
To demonstrate the workings of this system, one trailer lamp can be used as shown in Figure 4.13. The trailer must be connected (and thereby grounded) to the tow vehicle during this test. A helper will simplify this experiment. Find the tow car brake light wire and connect a wire between it and the loose lamp. Have your friend depress the brake pedal. The lamp does not light. Now, with the brake pedal depressed, touch the metal body of the loose lamp to the body of the trailer. Assuming you have done everything correctly (and you are touching bare metal, not paint) the lamp should light up. Figure 4.13 illustrates the method of connection required for this experiment. (The clearance light/headlight circuit could also be used and no helper would be required, as the headlight switch can be turned on and left on. Don’t forget to turn it off when you’re done, though.)
Each trailer lamp is connected in this manner to the corresponding lamp in the tow vehicle and grounded through the trailer’s metal body. Electric brakes require the same type of connection; i.e. a ground to the trailer frame and a wire connected to an on-off switch, usually in the form of an electric brake controller.
That’s the basic theory. How about the real thing? What happens when you go to buy lights? Wire? How do you mount them? Where? Too often this system is not given the importance it deserves, and the placement of lights is delayed to the last phase of the project. This sequence of events generally follows a pattern …
figure out and buy the suspension…
layout and build the frame…
attach the suspension …
set the trailer up on its wheels and
then stand back and say “I’m done”…
And in the same breath, as you notice the lack thereof, you gasp…”Uh oh! Where do I put the lights? and run the wire?” By now this question has become a serious problem. In fact, it is going to require such a staggering amount of work to weld wire guides from awkward positions, drill the necessary holes from weird angles and generally work in, around, and under your trailer that the question of feasibility may be purely academic… but this step must be done, or you won’t have lights. Licensing the trailer and driving at night will be impossible; day driving very unwise.

To avoid this scenario, the time to think about the electrical system is first! Up front! Before you cut metal! At least before you weld it! This process can be handled toward the end of your geometric layout if you have followed the suggested steps and done a drawing. The best approach is to interweave it with the whole design process. Certainly you want to determine it before you start to layout and weld your framework. And if holes need to be drilled or torched it can be done before you cover them up. Sufficient, timely attention to this area will save you time, money and a lot of headaches.
